Product docs and API reference are now on Akamai TechDocs.
Search product docs.
Search for “” in product docs.
Search API reference.
Search for “” in API reference.
Search Results
results matching
results
No Results
Filters
Themes, Modules, & Backups with Drupal Drush on Debian 7
Traducciones al EspañolEstamos traduciendo nuestros guías y tutoriales al Español. Es posible que usted esté viendo una traducción generada automáticamente. Estamos trabajando con traductores profesionales para verificar las traducciones de nuestro sitio web. Este proyecto es un trabajo en curso.
DeprecatedThis guide has been deprecated and is no longer being maintained. Please refer to the updated version of this guide.
Drush is a command line tool, which can be used for various Drupal projects. This tutorial uses Drush to install themes, modules, and a manual backup system, covering some basic administration tasks for Drupal websites.
Linode has another guide for installing Drush and creating a Drupal website, Installing & Using Drupal Drush on Debian 7 . Depending on your experience level with Drush, you may want to start with that guide.
Prerequisites
Before installing themes, modules, and a backup system with Drush, make sure that the following prerequisites have been met:
If you have not already done so, create a Linode account and Compute Instance. See our Getting Started with Linode and Creating a Compute Instance guides.
Follow our Setting Up and Securing a Compute Instance guide to update your system. You may also wish to set the timezone, configure your hostname, create a limited user account, and harden SSH access.
Configure a LAMP stack using the Hosting a Website guide.
Install Drush and a Drupal website core with the Installing & Using Drupal Drush on Debian 7 guide.
sudo. If you’re not familiar with the sudo command, you can check our
Users and Groups
guide.Installing Themes with Drush
Downloading, enabling, and setting the theme is extremely easy with Drupal Drush.
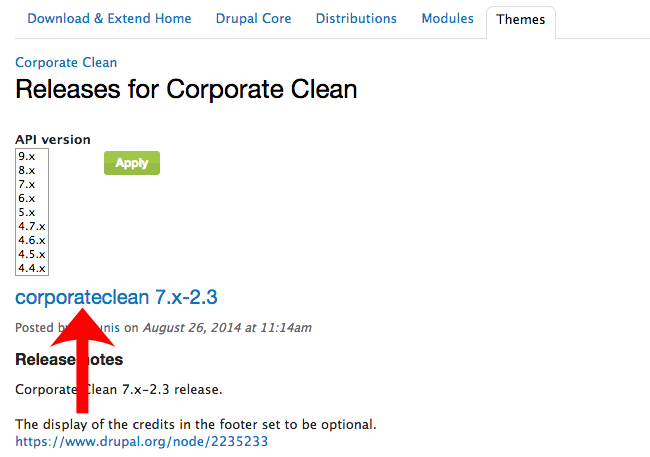
Find a theme to download. The Drush download name is usually in the release notes under the “Downloads” section on any drupal.org/project/project_theme theme page. Spaces are either removed or replaced with an underscore. Pictured below is an example. Here, “corporateclean” would be used in the Drush command:

Note At the time of this guide’s publication, this theme is not yet available for Drupal 8 beta. If you’re using this version of Drupal, select another theme to replace Corporate Clean for this example.While logged in as the website owner, download and enable the theme:
drush en corporateclean -yNote Notice the warning that “corporateclean was not found.” Thedrush encommand looks for the theme or module locally before downloading.Set Corporate Clean as the default, active theme:
drush vset theme_default corporatecleanCheck the homepage of your site and the new theme should appear.
Installing Modules with Drush
Downloading and enabling a module is similar to working with a theme. However, modules can be used for almost any purpose. From enhancing public-facing functionality to providing a better administrative UI, there are thousands of Drupal modules. Try to find modules with clear documentation. Once installed, the browser interface can still be challenging.
To download a popular module called Commerce, first install the supporting modules. There are several:
drush en addressfield ctools entity rules token views views_ui -yNow that the supporting modules have been installed, download and enable Commerce:
drush en commerce -yNote Notice that Commerce includes 21 sub-modules. Each has its own functionality and most have a control switch within the admin’s browser interface.Sign in to the Drupal browser interface and click on the “Modules” selection.

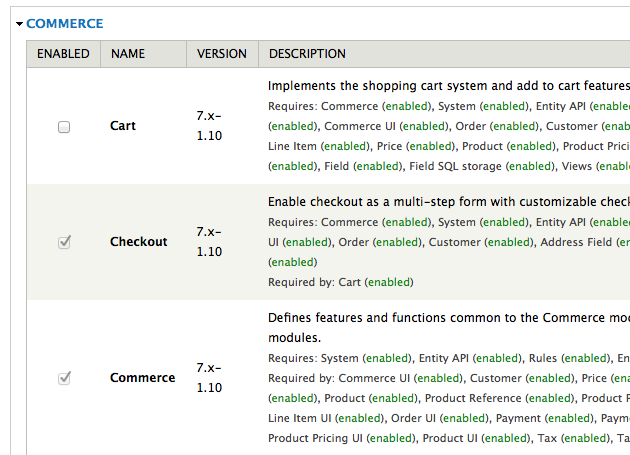
Next, scroll down to the “Commerce” module set, pictured below. Start checking or turning on the different Commerce sub-modules. Finally, select the “Save configuration” button at the very bottom of the page.

You have successfully installed and turned on a new module. The module is now running and ready to be used. In the case of the Commerce module set, notice the new “Store” menu on the Admin’s homepage.
Backup a Drupal Site with Drush
It’s always important to keep regular backups of a website. Backups protect you from losing data due to configuration changes, vulnerabilities, or system failures. Backups should be stored on a separate system whenever possible. Drush has built-in tools to help create backups of your site.
While in the
/drupaldirectory, create a .tar.gz back-up file containing the site database and site files with:drush archive-dumpThe site has been backed up locally. Notice the backup has been created and placed in the
/home/user/drush-backups/archive-dump/directory in a folder time stamped with its creation time. Drush saves your data into a .tar.gz archive file, containing the Drupal site folder and a copy of the MySql database.To copy the file to a remote backup location, use the rsync command. Replace the
date-time-stamp,examplesitename.date-time-stamp.tar.gz,user,ip-address, and/user/with the appropriate inputs:rsync -avz /home/user/drush-backups/archive-dump/date-time-stamp/examplesitename.date-time-stamp.tar.gz user@ip-address:/home/user/To revert back to a previously saved version of your site:
drush archive-restore /home/user/drush-backups/archive-dump/date-time-stamp/examplesitename.date-time-stamp.tar.gzThis will recreate the
drupalfolder, which you can then manually move into your web directory.
Automated Backups on Linode with Drush
The backup process above can be automated. You must create an SHH Pair Key, a Bash script, and use Cron automation.
Create SSH Key Pair Authentication without a password for the Linode hosting your Drupal site, and pass the public key to the backup server. This is a simple task. It’s covered in the Using SSH Key Pair Authentication section of the Securing Your Server guide.
On the Drupal hosting Linode, create a Bash script file. In the file excerpt below, replace
example.comand the rsync command inputs from step 2 above:nano drupal-backup.sh- File: ~/drupal-backup.sh
1
2
3
4
5
#!/bin/bash # Drupal Backup Script cd /var/www/example.com/public_html/drupal/ drush archive-dump rsync -avz /home/local-user/drush-backups/archive-dump/ remote-user@remote-ip-address:/home/user/
Make the script file executable:
chmod +x drupal-backup.shOpen and edit the Crontab file:
crontab -e- File: /tmp/crontab.A6VByT/crontab
1
2
3
4
5
6
7
8
# For example, you can run a backup of all your user accounts # at 5 a.m every week with: # 0 5 * * 1 tar -zcf /var/backups/home.tgz /home/ # # For more information see the manual pages of crontab(5) and cron(8) # # m h dom mon dow command 1 0 * * 1 ~/drupal-backup.sh
This back up configuration creates a saved version once a week. The Cron timer is set for 12:01 a.m. every Sunday. There are many ways to configure a back up with additional options to consider. Check our Cron guide for more information.
This backup system leaves saved versions of the site and database on both the local and remote Linodes. Depending on the disk size of your Linode, you may want to occasionally delete older backup versions. The deletion task could be automated within the Bash script above. Since the Cron timer is only set for once a week, disk usage is probably not a large concern. There are many configuration options to consider.
Next Steps
This guide was part of a series that created a Drupal site from start to finish on Linode. Your server is complete. Now that everything is installed, master the Drupal interface, Drupal modules, and themes. Create a stunning site for the world to see.
More Information
You may wish to consult the following resources for additional information on this topic. While these are provided in the hope that they will be useful, please note that we cannot vouch for the accuracy or timeliness of externally hosted materials.
This page was originally published on
