Product docs and API reference are now on Akamai TechDocs.
Search product docs.
Search for “” in product docs.
Search API reference.
Search for “” in API reference.
Search Results
results matching
results
No Results
Filters
Ruby on Rails with Nginx on Debian 5 (Lenny)
Traducciones al EspañolEstamos traduciendo nuestros guías y tutoriales al Español. Es posible que usted esté viendo una traducción generada automáticamente. Estamos trabajando con traductores profesionales para verificar las traducciones de nuestro sitio web. Este proyecto es un trabajo en curso.
DeprecatedThis guide has been deprecated and is no longer being maintained.
Ruby on Rails is a popular rapid development web framework that allows web designers and developers to implement fully featured dynamic web applications using the Ruby programming language. This guide describes the required process for deploying Ruby on Rails with Passenger and the nginx web server on Debian 5 (Lenny).
Set the Hostname
Before you begin installing and configuring the components described in this guide, please make sure you’ve followed our instructions for setting your hostname . Issue the following commands to make sure it is set properly:
hostname
hostname -f
The first command should show your short hostname, and the second should show your fully qualified domain name (FQDN).
Install Required Packages
To install a more current version of Ruby Gems, which is required for running Ruby on Rails on Debian 5 (Lenny), you must install several packages from the Backports project
. Insert the following line in your /etc/apt/sources.list file:
- File: /etc/apt/sources.list
1deb http://backports.debian.org/debian-backports lenny-backports main
Issue the following commands to update your system’s package database and all installed packages, and install the backports repository’s key:
apt-get update
apt-get upgrade
apt-get install debian-backports-keyring
Add the following snippet to the /etc/apt/preferences file:
1/etc/apt/preferences
Package: rubygems Pin: release a=lenny-backports Pin-Priority: 999
Package: rubygems1.8 Pin: release a=lenny-backports Pin-Priority: 999
Issue the following command to install packages required for Ruby on Rails.
apt-get install wget build-essential ruby1.8 ruby1.8-dev irb1.8 rdoc1.8 zlib1g-dev libopenssl-ruby1.8 rubygems1.8 libopenssl-ruby libzlib-ruby libssl-dev libpcre3-dev libcurl4-openssl-dev
Create symbolic links to the installed version of Ruby:
ln -s /usr/bin/ruby1.8 /usr/bin/ruby
ln -s /usr/bin/irb1.8 /usr/bin/irb
Install the rake and rack gems:
gem install rake rack
Finally, install the version of Ruby On Rails that your application requires. Issue one the following commands for the version you need:
gem install rails --version 2.1.2
gem install rails --version 2.2.2
gem install rails --version 2.3.5
gem install rails --version 3.0.4
If you are unsure of the version you require, you can install the latest version with the following command:
gem install rails
Additionally, the application you deploy will likely have additional dependencies. Install these dependencies before proceeding.
Install Passenger and Nginx
Proceed to the Phusion Passenger site and locate the link for the current source code tarball. Download it as follows (substitute the link for the current version):
cd /opt
wget http://rubyforge.org/frs/download.php/73563/passenger-3.0.1.tar.gz
tar xzvf passenger-3.0.1.tar.gz
Run the Phusion Passenger installer for Nginx:
cd /opt/passenger-3.0.1/bin
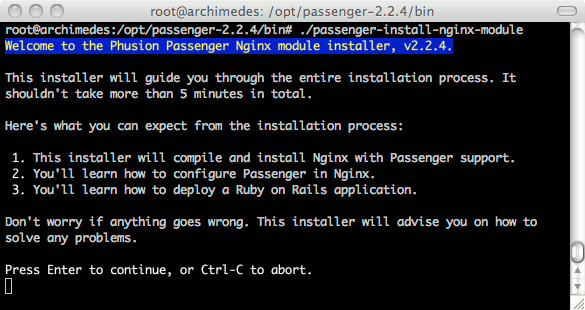
./passenger-install-nginx-module
You’ll be greeted by the Phusion Passenger Nginx installer program. Press “Enter” to continue with the installation.

When prompted for the Nginx installation method, we recommend you choose “1” to allow the installer to automatically download, compile, and install Nginx for you. Unless you have specific needs that would necessitate passing custom options to Nginx at compile time, this is the safest way to proceed.
Please do not remove the Passenger files from opt after the install. They need to stay in place or your install will not function correctly.
Set up an Init Script for Nginx
Nginx is now installed in /opt/nginx, but there are no “init” scripts to control this process. Issue the following sequence of commands to download a script, move it to the proper directory, set the proper permissions and set system startup links:
cd /opt
wget -O init-deb.sh http://www.linode.com/docs/assets/600-init-deb.sh
mv /opt/init-deb.sh /etc/init.d/nginx
chmod +x /etc/init.d/nginx
/usr/sbin/update-rc.d -f nginx defaults
You can now start, stop, and restart Nginx just like any other server daemon. For example, to start the server, issue the following command:
/etc/init.d/nginx start
The configuration file for Nginx is located at /opt/nginx/conf/nginx.conf. This is the file you’ll need to edit to add support for your Rails applications. A default server is already configured in this file, and it also contains examples for alternate virtual host and SSL configurations.
Install MySQL Support (optional)
If your application uses MySQL, install the database server by following our MySQL on Debian 5 (Lenny) guide . Once it’s installed and configured properly, issue the following commands:
apt-get install libmysqlclient15-dev libmysql-ruby
gem install mysql --no-rdoc --no-ri -- --with-mysql-dir=/usr/bin --with-mysql-lib=/usr/lib/mysql --with-mysql-include=/usr/include/mysql
More Information
You may wish to consult the following resources for additional information on this topic. While these are provided in the hope that they will be useful, please note that we cannot vouch for the accuracy or timeliness of externally hosted materials.
This page was originally published on
